How to Start Lettuce Seeds Easily With Bottle Mini-Greenhouses
# How to Start Lettuce Seeds Easily With Bottle Mini-Greenhouses
Starting lettuce seeds doesn’t require a garden or expensive equipment. In fact, with just a few recycled plastic bottles, you can create a set of mini-greenhouses perfect for germinating seeds indoors or on a balcony. This method is low-cost, eco-friendly, and ideal for beginners. It protects young seedlings from sudden temperature changes, keeps the soil moist, and gives your lettuce the best possible start before transplanting.
Why Use Bottle Mini-Greenhouses?
Plastic bottles can mimic the conditions of a greenhouse by trapping moisture and warmth. This environment helps seeds germinate faster and more evenly. For lettuce—which prefers cool, moist conditions but is sensitive to temperature extremes—these bottle mini-greenhouses offer a controlled, protected start. They also make seed starting accessible for those without garden space.
What You Will Need
Clear plastic bottles (1.5–2 liters work well)
Lettuce seeds (any preferred variety)
Seed-starting soil mix or fine, well-draining potting soil
A sharp knife or scissors
A small watering can or spray bottle
Waterproof labels or masking tape for marking varieties
Step-by-Step Instructions
1. Prepare the Bottles
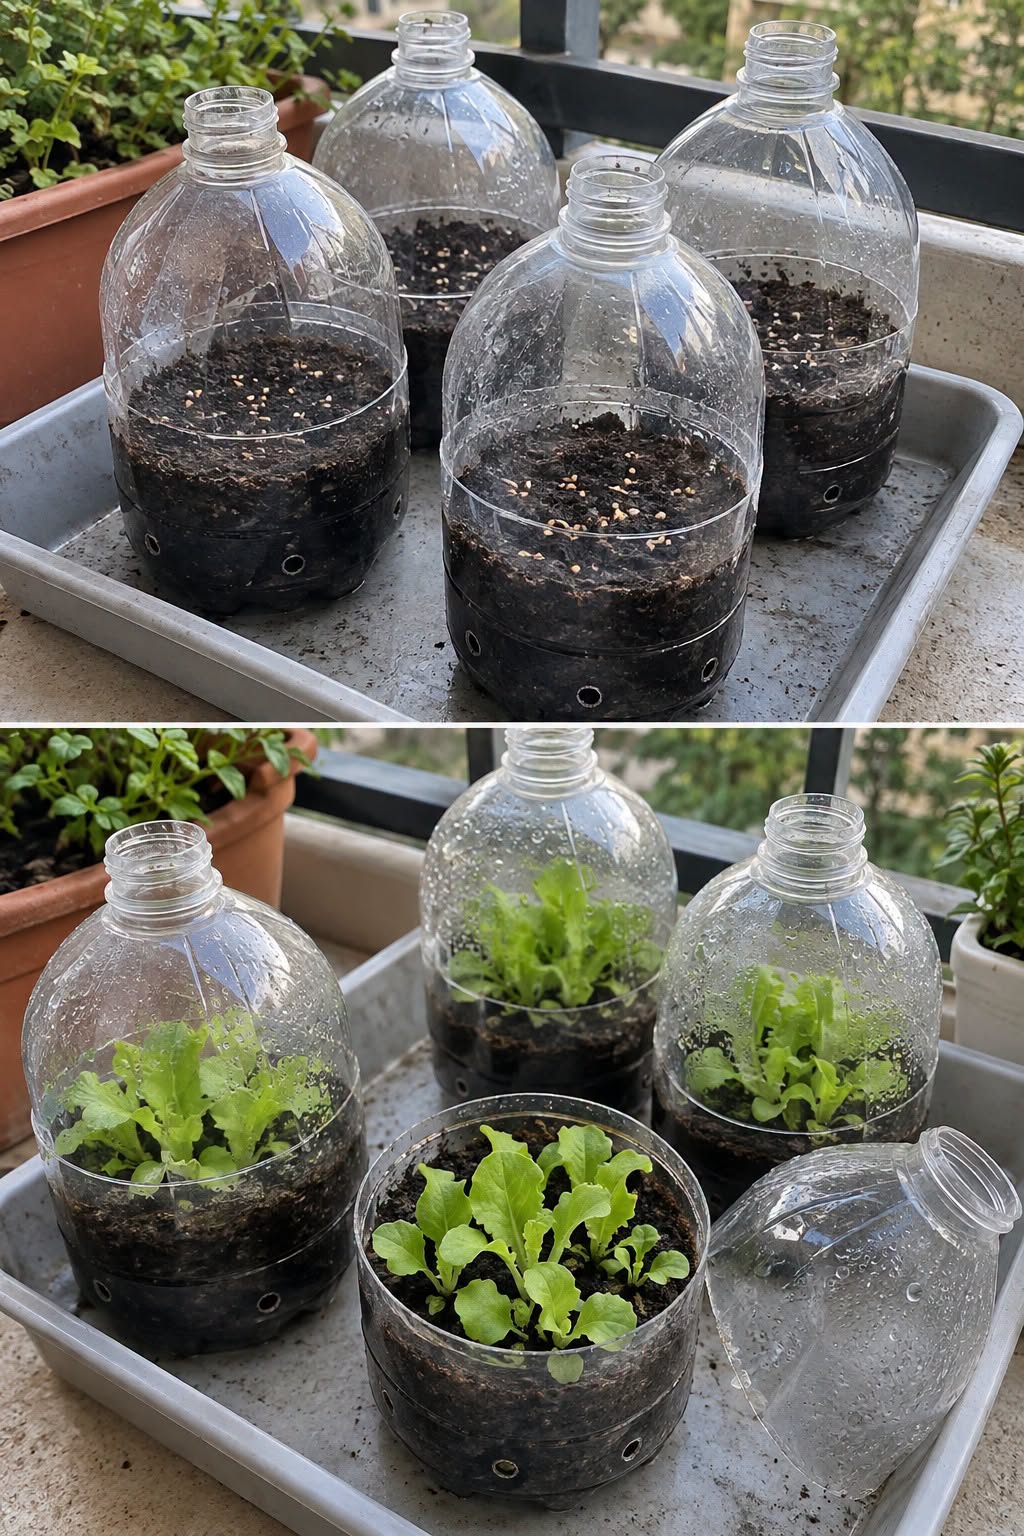
Wash and dry the bottles thoroughly to remove any residue. Cut each bottle roughly in half, keeping the bottom section deep enough to hold 6–8 cm of soil. The top half will act as the removable greenhouse lid.
2. Add Drainage
Poke a few small holes in the bottom of each bottle to allow excess water to drain. This prevents soggy soil, which can cause seed rot. Place the bottles on a tray to catch any water that escapes.
3. Fill with Soil
Add your seed-starting mix or fine potting soil to the lower half of the bottle. Lightly press the soil to remove large air pockets but avoid compacting it too much. Leave about 2 cm of space from the top to prevent overflow when watering.
4. Sow the Lettuce Seeds
Sprinkle the seeds evenly over the soil surface. Lettuce seeds are tiny, so avoid planting too densely. Lightly cover them with a thin layer of soil—no more than 3–5 mm—since they need some light to germinate.
5. Water Gently
Use a spray bottle or watering can with a fine spout to moisten the soil without washing away the seeds. The soil should be damp but not waterlogged.
6. Assemble the Mini-Greenhouse
Place the top half of the bottle back over the bottom, creating a dome that traps moisture and warmth. Remove the cap from the bottle to allow airflow and prevent overheating.
7. Choose the Right Location
Put your bottle greenhouses in a spot with bright, indirect light. A sunny windowsill works well, but avoid direct harsh midday sun, which can overheat the seedlings inside. Indoors, temperatures between 15–20°C are ideal for lettuce germination.
8. Monitor Moisture and Growth
Check the soil daily. The enclosed environment will keep it moist for longer, but if it starts to dry, lightly mist it. Within 5–10 days, you should see the first sprouts emerging.
9. Thin Seedlings
When the seedlings develop their first true leaves, thin them by snipping weaker ones at the soil line. This gives the remaining plants enough space and nutrients to grow strong.
10. Remove the Covers Gradually
Once the seedlings are established, start acclimating them to normal indoor air. Lift the top half of the bottle for a few hours each day over the course of a week. This reduces the risk of transplant shock later.
Transplanting
When the seedlings are about 7–10 cm tall and have at least three sets of leaves, they are ready to be transplanted into larger pots, garden beds, or balcony planters. To remove them:
Gently squeeze the bottle to loosen the soil.
Tip it slightly and slide the soil and seedlings out.
Separate seedlings carefully, keeping root disturbance to a minimum.
Replant into prepared soil, spacing them according to the seed packet instructions (typically 15–20 cm apart).
Tips for Success
Choose varieties suited to your climate – Loose-leaf lettuce types often germinate faster and tolerate a wider range of temperatures.
Label your bottles – If planting multiple varieties, use waterproof labels to avoid confusion.
Reuse the bottles – After transplanting, wash and store the bottles for your next seed-starting project.
Protect from pests – If starting outdoors, keep the bottles capped at night to deter insects or slugs.
Eco-Friendly Benefits
Using recycled bottles for seed starting helps reduce plastic waste while creating a self-contained growing system. Instead of buying disposable seed trays or greenhouse kits, you can upcycle materials you already have at home.
Final Thoughts
Bottle mini-greenhouses are an effective and inexpensive way to start lettuce seeds. They provide the warmth, moisture, and protection young seedlings need to grow strong before facing outdoor conditions. With just a little preparation, you can enjoy a steady supply of homegrown lettuce while cutting down on waste and costs. Whether you have a garden, a balcony, or just a sunny window, this method makes fresh greens accessible to everyone.
## Practical tips for better results
The most reliable way to get good results is to start with clean materials, suitable containers and consistent care. In gardening, light, moisture, drainage and temperature matter more than any single shortcut. Reused bottles, barrels and household containers can work well, but they need drainage holes and enough room for roots. Containers should also be stable and food-safe when used for edible crops.
For seedlings, keep the growing medium moist but not waterlogged. Too much water reduces oxygen around young roots and can encourage rot. A bright location is important once seedlings emerge. If natural light is weak, plants can become thin and stretched. Gradually expose young plants to outdoor conditions before moving them permanently outside.
When growing tomatoes, remember that larger plants need support, regular watering and enough root space. Lettuce and spinach prefer cooler conditions than tomatoes and can struggle in excessive heat. Check plants frequently rather than following a rigid watering schedule.
Reusing materials is a good way to reduce costs, but hygiene still matters. Wash containers before use and avoid containers that previously held hazardous chemicals. A simple, clean setup with good drainage is usually more effective than a complicated viral hack.
## Practical tips for better results
The most reliable way to get good results is to start with clean materials, suitable containers and consistent care. In gardening, light, moisture, drainage and temperature matter more than any single shortcut. Reused bottles, barrels and household containers can work well, but they need drainage holes and enough room for roots. Containers should also be stable and food-safe when used for edible crops.
For seedlings, keep the growing medium moist but not waterlogged. Too much water reduces oxygen around young roots and can encourage rot. A bright location is important once seedlings emerge. If natural light is weak, plants can become thin and stretched. Gradually expose young plants to outdoor conditions before moving them permanently outside.
When growing tomatoes, remember that larger plants need support, regular watering and enough root space. Lettuce and spinach prefer cooler conditions than tomatoes and can struggle in excessive heat. Check plants frequently rather than following a rigid watering schedule.
Reusing materials is a good way to reduce costs, but hygiene still matters. Wash containers before use and avoid containers that previously held hazardous chemicals. A simple, clean setup with good drainage is usually more effective than a complicated viral hack.