Simple Steps to Grow Spinach Successfully in 2-Liter Bottles
# Simple Steps to Grow Spinach Successfully in 2-Liter Bottles
Growing spinach at home is a smart, space-saving way to ensure a constant supply of fresh, nutritious greens. Even if you live in a small apartment or have limited gardening space, you can successfully grow spinach in recycled 2-liter plastic bottles. This method is low-cost, eco-friendly, and perfect for urban gardening. With just a few materials and basic care, you can enjoy a healthy harvest from your balcony, windowsill, or backyard.
Here’s a step-by-step guide to growing spinach in 2-liter bottles.
Why Grow Spinach in Plastic Bottles?
Spinach is a fast-growing leafy vegetable that thrives in cool temperatures and doesn’t need deep soil. Its shallow roots make it ideal for container gardening. By using plastic bottles, you not only save space but also reduce plastic waste—turning trash into productive, green mini-gardens.
This method is perfect for anyone who wants to start gardening with minimal cost and maximum efficiency.
What You’ll Need:
Clean, empty 2-liter plastic bottles
Good quality potting soil or compost-rich mix
Spinach seeds (choose fast-growing or baby-leaf varieties)
A sharp cutter or utility knife
Nail or screwdriver (for making drainage holes)
Watering can or spray bottle
Optional: Pebbles or charcoal pieces for improving drainage
Step 1: Prepare the Bottle
Start by washing the plastic bottle thoroughly to remove any residue. Remove labels for a cleaner look.
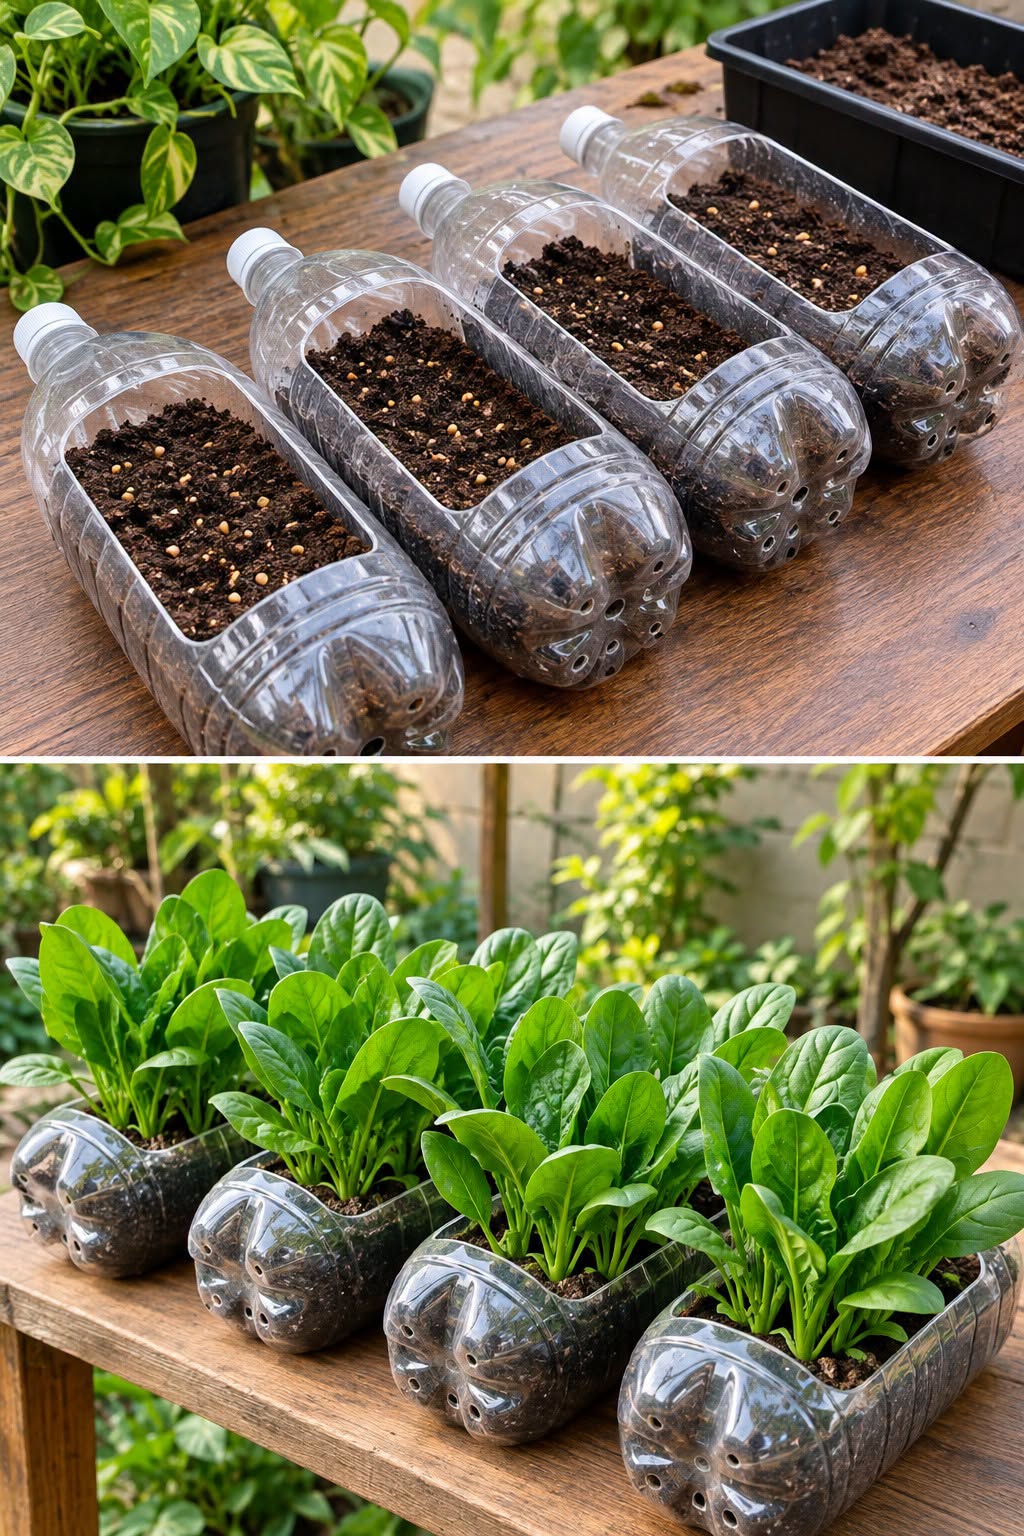
Using a cutter or knife, cut a wide rectangular opening on one side of the bottle. Make sure the opening is large enough to allow room for planting, watering, and growth, but leave some space around the edges for structure.
Poke 4–6 drainage holes at the bottom of the bottle using a nail or screwdriver. This is essential to prevent water from pooling and causing root rot.
If you prefer, you can also cut off the top portion of the bottle and plant directly from the top, turning it into a simple upright container.
Step 2: Add a Drainage Layer (Optional)
Add a small layer of pebbles or crushed charcoal at the bottom of the bottle to help with drainage and prevent soil compaction. This step is especially helpful in hot or humid environments.
Step 3: Fill the Bottle with Soil
Fill the bottle with potting soil, leaving about an inch of space from the cut edge to avoid soil overflow during watering.
Use loose, well-draining soil rich in organic matter. You can make your own mix by combining garden soil, compost, and a bit of coco peat or rice hulls for aeration.
Step 4: Sow the Spinach Seeds
Sprinkle spinach seeds evenly across the surface of the soil. Cover them lightly with a thin layer of soil—about 1/4 inch is enough. Press gently to ensure good seed-to-soil contact.
Water the soil gently using a spray bottle or a watering can with a narrow spout to avoid washing away the seeds.
Step 5: Provide Light and Moisture
Place the bottle in a location where it receives 4–6 hours of indirect sunlight daily. Spinach grows best in cool conditions and partial sun, so avoid harsh afternoon heat.
Water regularly to keep the soil moist but not soggy. In a small container like a bottle, soil tends to dry out quickly, especially in warm weather, so daily moisture checks are recommended.
Step 6: Thin the Seedlings
When the spinach seedlings are about 2 inches tall and have a couple of leaves, thin them out. Keep the strongest plants and remove the rest, leaving about 2–3 inches between each plant.
This gives each spinach plant enough space to grow healthy, full leaves without crowding.
Step 7: Feeding and Care
Spinach doesn’t require heavy feeding, but applying a diluted organic liquid fertilizer once every two weeks can boost growth and leaf production. You can also use compost tea or a fish emulsion.
Keep the container weed-free and remove any yellowing or damaged leaves to encourage healthy new growth.
Step 8: Harvesting Your Spinach
Spinach is typically ready to harvest in 30–40 days, depending on the variety and growing conditions.
To harvest, snip the outer leaves when they are large enough, allowing the center of the plant to continue producing more leaves. This “cut-and-come-again” method gives you a continuous supply of greens over several weeks.
Alternatively, you can harvest the entire plant when it reaches full size if you need a large batch at once.
Tips for Success
Plant new seeds every 2 weeks to ensure a steady supply.
During hot months, move the bottles to a cooler, shaded area to prevent bolting.
Make sure the bottles have proper drainage to avoid waterlogging.
Reuse the bottles for future planting—just refresh the soil before sowing new seeds.
Conclusion
Growing spinach in 2-liter bottles is a practical and sustainable gardening solution that works even in the smallest spaces. With minimal tools, recycled materials, and a bit of care, you can produce your own fresh, organic greens at home. This method not only saves money and space but also contributes to reducing plastic waste and living more sustainably. Give it a try and enjoy the satisfaction of harvesting your own healthy spinach, right from a bottle.
jardin
## Practical tips for better results
The most reliable way to get good results is to start with clean materials, suitable containers and consistent care. In gardening, light, moisture, drainage and temperature matter more than any single shortcut. Reused bottles, barrels and household containers can work well, but they need drainage holes and enough room for roots. Containers should also be stable and food-safe when used for edible crops.
For seedlings, keep the growing medium moist but not waterlogged. Too much water reduces oxygen around young roots and can encourage rot. A bright location is important once seedlings emerge. If natural light is weak, plants can become thin and stretched. Gradually expose young plants to outdoor conditions before moving them permanently outside.
When growing tomatoes, remember that larger plants need support, regular watering and enough root space. Lettuce and spinach prefer cooler conditions than tomatoes and can struggle in excessive heat. Check plants frequently rather than following a rigid watering schedule.
Reusing materials is a good way to reduce costs, but hygiene still matters. Wash containers before use and avoid containers that previously held hazardous chemicals. A simple, clean setup with good drainage is usually more effective than a complicated viral hack.
## Practical tips for better results
The most reliable way to get good results is to start with clean materials, suitable containers and consistent care. In gardening, light, moisture, drainage and temperature matter more than any single shortcut. Reused bottles, barrels and household containers can work well, but they need drainage holes and enough room for roots. Containers should also be stable and food-safe when used for edible crops.
For seedlings, keep the growing medium moist but not waterlogged. Too much water reduces oxygen around young roots and can encourage rot. A bright location is important once seedlings emerge. If natural light is weak, plants can become thin and stretched. Gradually expose young plants to outdoor conditions before moving them permanently outside.
When growing tomatoes, remember that larger plants need support, regular watering and enough root space. Lettuce and spinach prefer cooler conditions than tomatoes and can struggle in excessive heat. Check plants frequently rather than following a rigid watering schedule.
Reusing materials is a good way to reduce costs, but hygiene still matters. Wash containers before use and avoid containers that previously held hazardous chemicals. A simple, clean setup with good drainage is usually more effective than a complicated viral hack.